Your cart
There are no more items in your cart
Introduction
Vermicomposting is an ecological and sustainable composting method that uses worms to break down organic waste into nutrient-rich compost. The resulting compost is ideal for nourishing plants and promoting their growth. It's also a very practical way of reducing the volume of waste we produce at home. If you'd like to get started with vermicomposting, it's perfectly feasible to place your vermicomposter outdoors! You'll just have to pay more attention to the conditions in which your little friends thrive.
The benefits of vermicomposting: indoors and outdoors
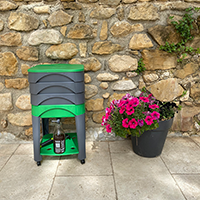
Vermicomposting, whether indoors or outdoors, has a number of advantages. First of all, it further reduces the volume of waste you produce at home, which is ideal for people who want to adopt a greener lifestyle. What's more, the resulting compost is of high quality and can be used to nourish your plants and garden. It also reduces the need for fertilizers and pesticides. Vermicomposting is also very simple and easy to set up, and can be an educational activity for children. Ideally, vermicomposting should be carried out indoors, but it's also possible to set up a vermicomposter outdoors, on a terrace, in a garden or on a balcony. Here's everything you need to know about outdoor vermicomposting.
Precautions: outdoor vermicomposter, terrace, garden or balcony
When you're vermicomposting and you've decided to place your vermicomposter outdoors (garden, terrace, balcony...), it's important to take certain precautions to ensure the health and survival of the compost worms. Here are a few precautions to take:
1. Choose a suitable location
Choosing the right location for your vermicomposter is crucial to its success. You can install it on a terrace or balcony, but you'll need to choose a protected spot, away from the elements, rain, sun and wind. Make sure it's shaded and protected from the heat. The advantage of an indoor vermicomposter is its accessibility. It's easier to dispose of organic matter in the kitchen than at the bottom of the garden on cold winter days. So it's worth thinking about accessibility.
2. Protect compost from water
Worms need a moist but not soggy environment. Too much water can drown the worms and upset the balance of the compost. The whole system could suffocate. Make sure the vermicomposter is well drained and not exposed to excessive amounts of water. You'll need a shelter to protect the compost from water; use an umbrella, for example, or place it under a piece of furniture resistant to outdoor conditions. In case your outdoor vermicomposter gets waterlogged, add cardboard accordingly and stir the compost with a tool that won't hurt your little friends. Stirring and mixing carbonaceous matter with the compost will create air pockets, and excess moisture will be absorbed.
3. Keep an eye on the temperature
Compost worms need a temperature of between 15°C and 25°C to survive. In summer, it may be necessary to move the vermicomposter to a cooler location to prevent the worms from dying of heat, but beware of excessive temperatures: below 0°C and above 35°C. So be careful if your vermicomposter is placed on a sunny terrace. In winter, you can add insulating materials such as frigolite or wood, in the form of a formwork, to protect the compost from the outside temperature. You can also place a blanket around your vermicomposter so as not to block the vents on the lid. They still need oxygen
4. Avoid unsuitable foods
Certain foods are unsuitable for composting, including citrus fruits, onions, garlic and dairy products. These foods can upset the compost balance and acidify the environment. Meat and fish should also be avoided, as the same bacteria are not involved and may attract maggots and flies. Fats and oils are also to be avoided, as they create a film that settles on the compost worms' skin and suffocates them. Choose fresh materials such as fruit and vegetable peelings. Plate scraps should also be avoided, as they usually contain salt and spices.
5. Avoid chemicals
As we know, chemicals such as pesticides and herbicides can disrupt the biological balance of life as a whole. The same is true inside a vermicomposter. Compost worms, bacteria, fungi, macro- and micro-organisms are all sensitive to them. This doesn't mean they'll die, but too much of them in a vermicomposter could disrupt the environment. It's all a question of balance.
6. Monitor humidity
Compost worms need a moist environment to survive, but excess moisture can drown the worms and upset the compost's balance. Generally speaking, it's not essential to aerate the contents of your vermicomposter; the humidity will be regulated according to the inputs you've balanced beforehand (60% fresh matter for 40% dry matter). Mixing these materials together before feeding them to your little friends will create a homogenous, balanced system. In the same way, you won't need to water or moisten your vermicomposter if this balance is respected. Bear in mind, however, that more air will circulate on a terrace or balcony, so your outdoor vermicomposter may dry out more quickly. When this happens, don't hesitate to rewet it!
7. Keep an eye on acidity
Compost worms need a neutral or slightly acidic environment to survive. Certain foods, such as sugary waste, can be very acidic. Regularly monitor the pH of the compost and adjust it if necessary by adding alkaline materials such as dried and ground eggshell. To do this, use a mortar and pestle or a food processor. You can add a handful each time you bring in delicate waste, or one or two handfuls a month.
Steps for setting up an outdoor vermicomposter
Here are the steps to follow to set up an outdoor vermicomposter:
1. Choose a suitable location for your outdoor vermicomposter, taking into account the precautions mentioned above.
2. Add a piece of cardboard, not too thick, to the bottom of the vermicomposter to act as a litter tray (see our"Vermicomposter starter kit")
3. Add your composting worms with wet pieces of cardboard to help them get started, since worms need a moist substrate.
4. Add organic waste to the vermicomposter on a regular basis, avoiding unsuitable foods and maintaining a balance between green and brown waste.
5. Regularly monitor the compost's humidity, acidity and temperature.
6. Then harvest vermicompost and liquid fertilizer for your plants!
Conclusion
Outdoor vermicomposting is an ecological and sustainable way of reducing the waste we produce at home, while producing nutrient-rich compost to feed our plants and garden.
By taking certain precautions and following the steps for setting up an outdoor worm compost bin, you can enjoy its benefits while avoiding common pitfalls. Make sure you choose a suitable location (protected balcony, terrace, garden shed), use the right materials and add organic waste regularly. Monitor the compost's humidity, acidity and temperature to ensure a healthy environment for the compost worms and to obtain quality compost.
By practicing vermicomposting outdoors, you're helping to reduce your ecological footprint and promote a more sustainable, responsible lifestyle. Don't hesitate to share this method with your friends and family to encourage them to adopt this environmentally-friendly practice!
See also article: How to get started with your vermicomposter
Comments (0)